Learning film photography continues to be fun. Digital photography is so forgiving because so much can be fixed during editing. Typically not so much with film, at least not now with my current skill set. I'm learning that I need to pay attention every step of the way.
So for starters, when loading film into the camera, be sure about the film and it's ISO. I goofed. I thought it was Gold 200, when in fact it was Ektar 100. That makes a huge difference in exposure settings. When I dropped it off at the lab I mentioned that, and asked the film to be pushed 1 stop during developing. I think it worked out. This is on 120 film in the GW690.
Cleaning the lens is always a good idea, and that includes the camera that is scanning the negatives. There's one faint line that is consistent in several negatives that I think is actually in the scanning camera. I don't really like any of the images where that faint line shows up enough to scan it again. Although I suppose I should clean the camera, pick a negative and do it again so that I know for sure.
For the astro session we went out to Forget-Me-Not pond. It was a perfect evening for sky photography. There was no wind so the pond was calm, there were no clouds, there were no bugs, and it was warm. We set up looking mostly straight south to catch the galactic core.
Here's the film view, trying to expose for the shadows, but the sky was still surprisingly bright. (f3.5, about 2 or 3 seconds exposure) For those interested in this camera, the 90mm f3.5 equivalent in full frame terms is about 38 to 40 mm, and f1.2.)
As an aside, exposures more than a second, and less than about 5 seconds are kind of imprecise with this camera because it's a T mode, not B. Meaning the shutter stays open till the shutter speed is changed. I cover the lens with a hat and reach under it to do this. I suppose if I really, really knew what I was doing in situations like this I could slowly cover the lens with a piece of card stock from the top down, so it acts like the old neutral density filter in Lightroom that you could drag down. It seems like a chancy proposition.
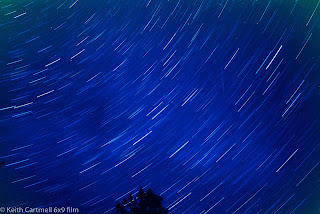
Once I got the digital camera set up and clicking away, I started with the film camera. The initial plan was to aim straight north between some trees that I thought would make for a nice composition. After some tripod trouble I put a beanbag down on the ground. I made sure the focus was set to infinity, lens open to f3.5, put it down on the beanbag, aimed pretty much straight up, and clicked the shutter button. No way I was going to lie down and try to peer through the range finder for composition. This was one place where having one of the shutter buttons on the front of the camera makes it easy. The first exposure was 15 minutes, the second was 20, and I moved the camera a bit between photos.
They look like this.
This digital photo from that evening ended up being July Image of the Month. (Sigma 14mm f1.8, 30 seconds)
Here's the other single digital images I liked, just for fun. There's lots of other photos with various satellites and aircraft in them.
When I'm capturing the night sky I sometimes assemble many images into one to get the star trail effect, but that night the digital intent was to get nice single shots of the galactic core.
For the next session I'll do a bit more research around the specific film I plan to use, (and make sure that's what goes into the camera!) what filters might be useful, and aperture suggestions. I shot wide open because that lens is still sharp, but closing down a stop might help with the vignetting. I've got two more chances coming up, one in the Great Sand Hills, and the second in Yukon. Hmmm, I should probably research capturing northern lights on film, last time I was there, it was spectacular!


No comments:
Post a Comment
Looking forward to reading your comments.